Training LLaMA2-7B with Multiple Nodes
Colossal-AI is a cutting-edge, open-source framework for training large models, developed by HPC-AI Tech. It offers a variety of parallelism strategies, including 3D Tensor Parallelism and Sequence Parallelism, as well as some heterogeneous memory management techniques. Colossal-AI has been widely adopted by different companies and institutions to enhance the computational efficiency of their training processes.
This guide will walk you through the process of training the LLaMA2-7B model using the Colossal-AI framework on HPC-AI.com. In the second half of this document, we will also provide a walkthrough on how to train the model with multiple nodes on the HPC-AI.com platform.
Create a GPU Instance
-
Log in to the HPC-AI.com website:
- After logging in, navigate to the Instances page.
-
Create an instance:
- (Optional) Configure shared storage by going to the shared storage page, clicking Create Storage, and creating the necessary space.
- Click the "Create GPU Instance" button to start the creation process.
-
Select the configuration:
- Select the GPU type.
- Select the server location.
- Select the number of cards (e.g., 8 cards per machine).
- (Optional) Mount the previously created shared storage.
-
Configure instance information:
- Instance Name:
colossal - Image: Select CUDA (12.1) ubuntu==20.04, cuda==12.1, python==3.11, conda, or upload a custom one.
- External storage: Not used in this case due to small data size.
- Instance Name:
-
Initialize the instance:
- Wait for the instance to initialize after configuration.
- Connect to the instance via SSH once initialized.
Environment Configuration
-
Create a Conda environment:
conda create --name myenv python=3.11
conda activate myenv -
Install PyTorch:
pip install torch torchvision torchaudio --index-url https://download.pytorch.org/whl/cu121 -
Verify installation:
import torch
print(f"PyTorch version: {torch.__version__}")
print(f"Is CUDA available: {torch.cuda.is_available()}")
if torch.cuda.is_available():
    print(f"CUDA version: {torch.version.cuda}")
    print(f"Number of GPU devices: {torch.cuda.device_count()}")
    for i in range(torch.cuda.device_count()):
        print(f"Device {i}: {torch.cuda.get_device_name(i)}")
Installing Colossal-AI
Note: Please execute the following commands within the virtual environment you created earlier to ensure that all dependencies for Colossal-AI are properly installed.
-
Clone the official repository:
cd ~
git clone https://github.com/hpcaitech/ColossalAI.git
cd ColossalAI -
Compile Kernels:
BUILD_EXT=1 pip install . -
Install Flash Attention:
pip install flash-attn --no-build-isolation -
Install NVIDIA Apex:
cd ~
git clone https://github.com/NVIDIA/apex
cd apex
git checkout 22.04-dev-
Modify the
setup.pyfile at line 36:#if (bare_metal_major != torch_binary_major) or (bare_metal_minor != torch_binary_minor):
# pass -
Install dependencies:
pip install -r requirements.txt -
Build and install:
pip install -v --disable-pip-version-check --no-cache-dir --global-option="--cpp_ext" --global-option="--cuda_ext" ./
python setup.py install -
Comment out
from torch._six import string_classesin_initialize.pyand replacestring_classeswithstrin line 42.
-
-
Install TensorNVME:
cd ~
git clone https://github.com/hpcaitech/TensorNVMe.git
apt-get update
apt-get install cmake
pip install -v --no-cache-dir .
Training the LLaMA2-7B Model
-
Prepare the training script:
- Modify
/root/ColossalAI/examples/language/llama/scripts/benchmark_7B/gemini.sh:#!/bin/bash
cd /root/ColossalAI/examples/language/llama/scripts/
export OMP_NUM_THREADS=64
colossalai run --nproc_per_node 8 benchmark.py -g -x -b 6 -s 10 --shard_param_frac 0
- Modify
-
Execute the training script:
bash /root/ColossalAI/examples/language/llama/scripts/benchmark_7B/gemini.sh -
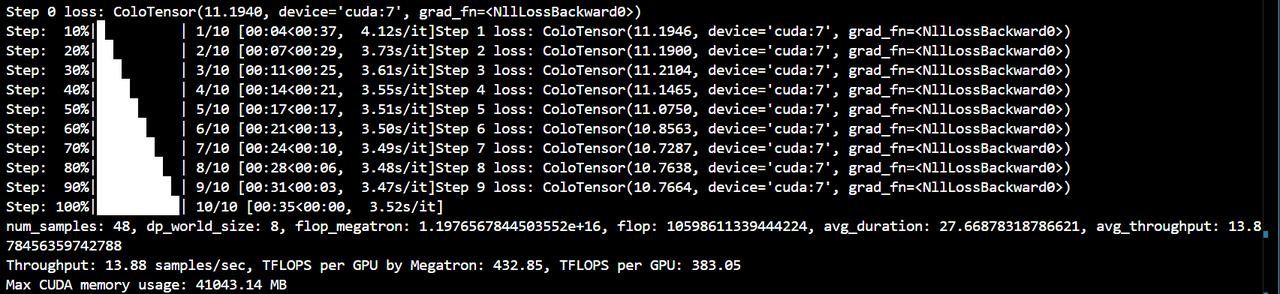
Result Plot:
-
Try 3D parallelism:
-
dp8+tp1+pp1+zero2:colossalai run --nproc_per_node 8 benchmark.py -p 3d -g -x -b 16 -s 10 --tp 4 --zero 2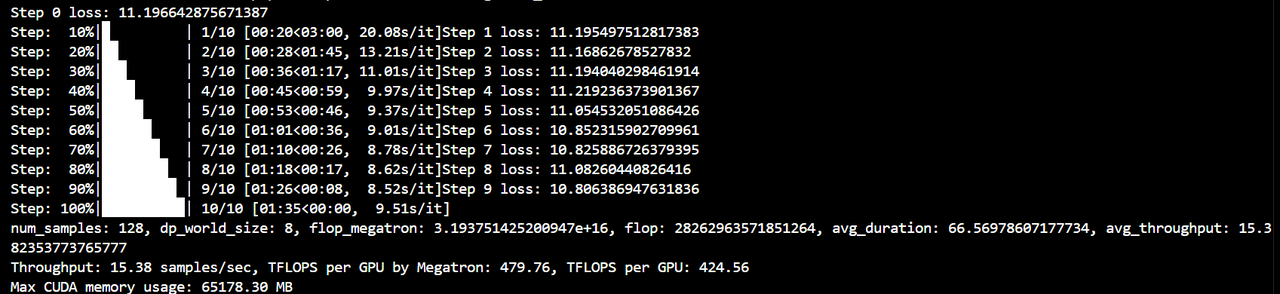
-
dp4+tp1+pp2+zero1:colossalai run --nproc_per_node 8 benchmark.py -p 3d -g -x -b 128 -s 10 --pp 2 --zero 1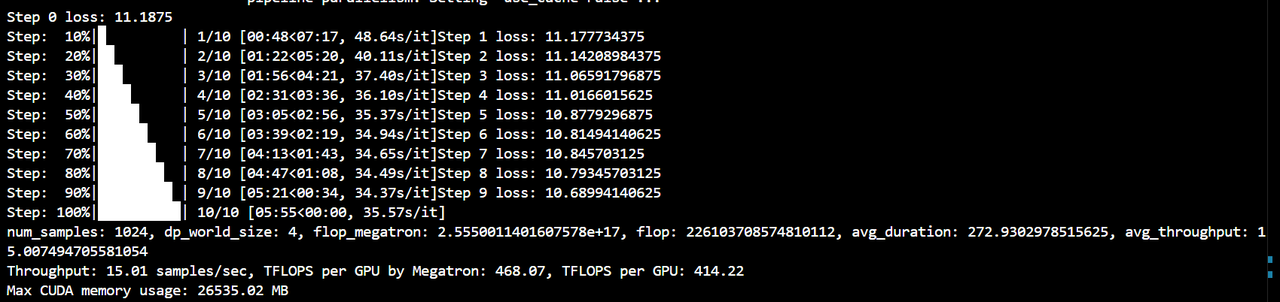
-
Multi-Machine Training Guide
The following multi-machine startup guide also applies to frameworks that use torch.distributed for distributed communication initialization, such as Megatron, FSDP, Nanotron, etc.
1. Environment Preparation
Make sure the same version of Python and PyTorch are installed on all nodes. It is recommended to use Anaconda to manage the environment to avoid version conflicts.
- If you use the IB network, you need to install the necessary software
perftest. - In order to execute commands without passwords between different nodes, you need to configure SSH passwordless login:
- Generate an SSH key pair (on the master node).
- Copy the public key to all nodes.
2. Configure Environment Variables
Set the necessary environment variables in the script, which are used to configure the parameters for distributed training.
MASTER_ADDR: The IP address of the master node, all other nodes will connect to this address.MASTER_PORT: The port number of the master node, used for communication.NUM_GPUS_PER_NODE: The number of GPUs available on each node.NNODES: The total number of nodes participating in the training is determined by the number of IPs innode_ip_list.txt.NCCL_DEBUG(optional): Setting toINFOor higher can help debug NCCL-related communication issues.
export MASTER_ADDR="10.42.128.230"
export MASTER_PORT="12345"
export NUM_GPUS_PER_NODE=8
export NNODES=$(grep -c '^' /root/ColossalAI/examples/language/llama/node_ip_list.txt)
export NCCL_DEBUG=INFO
Note: The above MASTER_ADDR is just an example, and the user needs to replace it according to the actual IP address. You can view the IP address on the server by using the following command (you need to install the corresponding tool iproute2 first, installation method: apt install iproute2):
ip addr show
3. Create a Node List File
Create a text file (such as node_ip_list.txt) with each line recording the IP address of a node participating in the training. This is used to determine the number of nodes participating in the training. For example:
10.42.128.230
10.42.128.231
10.42.128.232
4. Write a Startup Script (a simple script to start multiple Machines)
Define the function to start training, which is responsible for starting the training process on each node. If it is the master node, run the training script directly; if it is not the master node, execute it remotely through SSH.
start_training_on_node() {
    local ip=$1
    local rank=$2
    if [ "$ip" == "$MASTER_ADDR" ]; then
        # If it's the master node, run directly
        torchrun \
            --nnodes=$NNODES \
            --node_rank=$rank \
            --nproc_per_node=$NUM_GPUS_PER_NODE \
            --master_addr=$MASTER_ADDR \
            --master_port=$MASTER_PORT \
            /root/ColossalAI/examples/language/llama/benchmark.py -c 7b -g -p 3d -x -b 64 -s 10 --pp 2 --sp 2 --tp 1 --sp_mode "all_to_all" --zero 1 -l 32768
    else
        # If it's not the master node, execute remotely via SSH
        ssh root@$ip "
            export PATH=/root/.local/bin:\$PATH
            export OMP_NUM_THREADS=8
            torchrun \
                --nnodes=$NNODES \
                --node_rank=$rank \
                --nproc_per_node=$NUM_GPUS_PER_NODE \
                --master_addr=$MASTER_ADDR \
                --master_port=$MASTER_PORT \
                /root/ColossalAI/examples/language/llama/benchmark.py -c 7b -g -p 3d -x -b 64 -s 10 --pp 2 --sp 2 --tp 1 --sp_mode \"all_to_all\" --zero 1 -l 32768
        "
    fi
}
-
Export the function so that it can be called from a subshell.
export -f start_training_on_node -
Get the node ranking (rank). The rank of the master node is 0.
ranks=$(seq 0 $((NNODES - 1))) -
Start training.
combined=$(paste -d ' ' /root/ColossalAI/examples/language/llama/node_ip_list.txt <(echo "$ranks"))
echo "$combined" | xargs -P $NNODES -n 2 bash -c 'start_training_on_node "$1" "$2"' _
5. Run the Script
Make sure all nodes can access each other through SSH without password. Then, execute the script on the master node:
#!/bin/bash
export MASTER_ADDR="10.42.128.230"
export MASTER_PORT="12345"
export NUM_GPUS_PER_NODE=8
# export NCCL_DEBUG=INFO
export NNODES=$(grep -c '^' /root/ColossalAI/examples/language/llama/node_ip_list.txt)

start_training_on_node() {
    local ip=$1
    local rank=$2
    if [ "$ip" == "$MASTER_ADDR" ]; then
        torchrun \
            --nnodes=$NNODES \
            --node_rank=$rank \
            --nproc_per_node=$NUM_GPUS_PER_NODE \
            --master_addr=$MASTER_ADDR \
            --master_port=$MASTER_PORT \
            /root/ColossalAI/examples/language/llama/benchmark.py -c 7b -g -p 3d -x -b 64 -s 10 --pp 2 --sp 2 --tp 1 --sp_mode "all_to_all" --zero 1 -l 32768
    else
        ssh root@$ip "
            export PATH=/root/.local/bin:\$PATH
            export OMP_NUM_THREADS=8
            torchrun \
                --nnodes=$NNODES \
                --node_rank=$rank \
                --nproc_per_node=$NUM_GPUS_PER_NODE \
                --master_addr=$MASTER_ADDR \
                --master_port=$MASTER_PORT \
                /root/ColossalAI/examples/language/llama/benchmark.py -c 7b -g -p 3d -x -b 64 -s 10 --pp 2 --sp 2 --tp 1 --sp_mode \"all_to_all\" --zero 1 -l 32768
        "
    fi
}

export -f start_training_on_node
ranks=$(seq 0 $((NNODES - 1)))
combined=$(paste -d ' ' /root/ColossalAI/examples/language/llama/node_ip_list.txt <(echo "$ranks"))
echo "$combined" | xargs -P $NNODES -n 2 bash -c 'start_training_on_node "$1" "$2"' _
The above is the complete process and configuration of multi-machine training. I hope this can help you use Colossal-AI for distributed training smoothly.
Note: This tutorial uses the Colossal-AI main branch code (2024.12.8) by default. If some packages are missing or have installation problems due to the main branch upgrade, you can install them yourself through pip.